
IT'S TIME TO BUILD YOUR WALL.
This post contains affiliate links. If you click through and make a purchase, I may earn a commission at no extra cost to you.
Start Deciding
Choose your bracket system
{{systems_table}}Do you want to glue this to a panel to mount or do you want to mount this directly to a wall?
Measure your available wall space.
A single board in the 1x3 system takes approximately 3 inches of vertical space. So for each vertical foot 4 boards are necessary. Each column of brackets requires 1 cap and 1 shoe. (This combination holds one board to the wall.) Add Single or Double Main Bodies for additional boards as appropriate for your configuration.
Wall Mount
More load support - Directly screwing the brackets to studs increases the load bearing capability of the installation.
More Permanent
More precision needed during installation
Restricted based on stud locations
Panel Mount
Less load - Panel mounting requires gluing to a panel that is then mounted to the wall. Weight limits are subject to the glue used to stick it all together.
More portable, ideal for non-permanent installations
More flexible with spacing and location.
How many columns do you want?
I recommend 2 ft of spacing between each bracket column and 1 ft of free hanging end if doing a panel mount. So for a 4ft wide panel you could have as few as 2 columns. (1ft,C,2ft,C,1ft). At 6 ft you would get 3 columns. Etc,etc.
Wall mount spacing will be determined based on the studs in your wall. I recommend 1 column per stud.
How many horizontal boards do you want?
Each board section needs 4" of vertical space (2.5" for the board, +.5" for the bracket above the board, and +.5" for the bottom bracket shoe spacing below the bottom-most board). So you get 4 boards per 1 ft of vertical wall space (essentially). You could have a single board setup but we suggest at least 2 horizontal boards. You will need to math out how many you want for your setup.
Start Shopping
Horizontal Boards
Refer to the table below and select the appropriate boards.
Bracket System
1x3
Actual dimensions are 2.5" x 0.75", and these can be had in almost any length you need.
Fasteners
The OTW system is standardized around 1/4x20 hardware. For each horizontal board on each column of brackets you will need:
1x 1/4x20 Hex Nut - Amazon
1x 1.25" Hex head Screw - Amazon
1x 1/4" Washer - Amazon
Wall Mount Only - 1/4x20 Hex Head Lag Bolts - Amazon
(Panel Mount Only) Backing Panel - Use 1/8th" plywood. not MDF or some sort of fiber/pressure formed wood panel.
Filament
I used PLA Pro for mine, it's what I had on hand. Really almost any filament will work with some caveats based on your environment. I would avoid any art-type filaments like PLA Silk. Additives of this type make the parts weaker in general.
A few of my favorites:
| Filament | Where to buy |
|---|---|
| GreenGate 3D PETG | GreenGate |
| Polymaker (PLA Pro) | Polymaker · Amazon |
| Overture (PLA+) | Amazon |
Tools
Start Printing
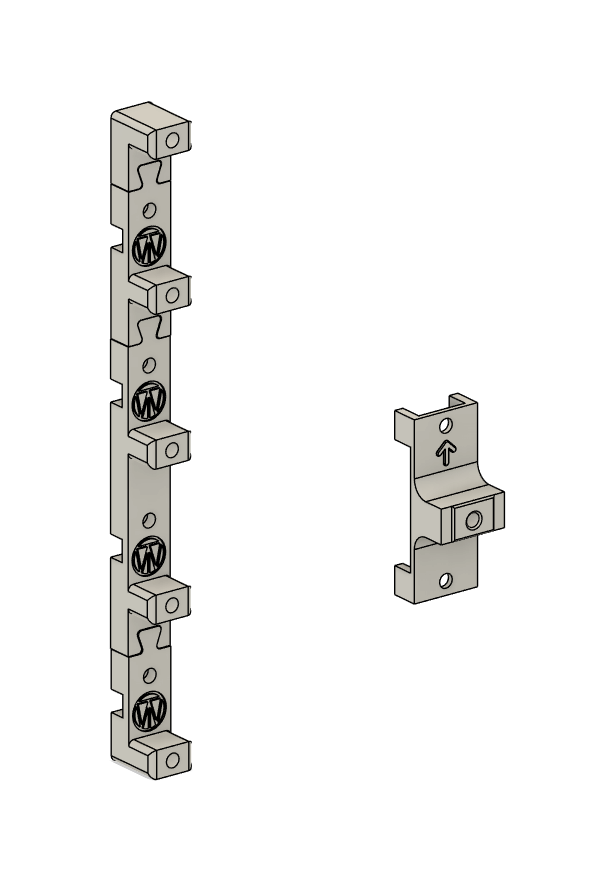
It starts with this basic set of wall brackets.
Get The Wall Brackets
{{wall_brackets}}The recommended print settings are 6-10 walls at 60% infill. This is not a hard and fast rule and your mileage may vary. I suggest printing a small set to test with initially by hanging weights or sandbags from it to find the specific failure point for your filament/print profile combination.
Each column will need 1 cap and 1 shoe, as many body brackets as your setup demands.
Build your wall
A full video guide will be coming soon.
Panel Mounting
Step 1 - Setup
Gather together all your materials:
- Wall Brackets ( 1 Cap, 1 Shoe, As many main bodies as you decided.)
- Drilling Jig
- 1/4x20 Nut
- 1.25" 1/4x20 bolts
- 1/4" washer
- Adhesive
- Drywall screws
- Tools:
- Caulking Gun
- Level
- Straight Edge
- Pencil
- Screwdriver
- Wrench
- Stud Finder
- Drill
- 5/16th" Drill Bit
Start by cleaning up the support material on your wall bracket prints.
Step 2 - Assemble the Panel
- Set the panel on a flat surface large enough to fit your boards (we will need them to ensure spacing and alignment of the brackets.)
- Measure 1-2 inches from the left and right sides of the panel.
- With the pencil mark a vertical guide line from the top to the bottom of the panel.
- Install a 1/4" Nut in the recess on the back of each bracket (except the cap)
- Apply the adhesive caulk to the backside of the bracket starting with both caps.
- Align on the panel as desired.
- Continue installing brackets in pairs in this manner. Each time a board channel is completed, set a board in it to ensure proper alignment.
- When bracket installation is finished set something heavy over each column of brackets to ensure adhesion and wait to dry.
- If more columns are required for your assembly, remove the boards and glue the columns to the panel following the previous steps.
Step 3 - Panel Installation
Locate where on your wall you want your panel.
Get the stud finder and find the studs within that area. Mark them in a manner that will be visible with the panel on the wall.
Remove the weights and boards from your panel and hold the panel up against the wall.
using the stud location marks as reference screw the panel to the wall ensuring that it is level.
Once mounted, get the drilling jig and a board.
Align the board as desired on the wall/panel.
Place the drilling jig so its alignment features straddle the board and bracket column.
Place the 5/16th" drill bit in the aligning hole and drill a hole in the horizontal board.
Be careful not to drill too far and mess up the nut. There should be a perceptible drop in force required once the drill bit comes through the back side of the board.
Remove the drilling jig and install the 1.25" 1/4x20 bolt and washer.
Repeat for each column and each board.
Wall Mounting
Step 1 - Setup
Gather together all your materials:
- Wall Brackets (1 Cap, 1 Shoe, as many main bodies as you decided)
- Drilling Jig
- 1/4x20 Lag Bolts
- 1/4" washers
- Your boards, cut to length
- Tools:
- Level
- Pencil
- Drill / Bit Driver / Screwdriver
- 5/16" Drill Bit
- 7/16" Socket
- Wrench
- Stud Finder
Clean the support material off your bracket prints. Unlike panel mounting, no nuts are pressed into the brackets. The lag bolt threads directly into the stud.
Step 2 - Prep and Drill the Boards
- Use the stud finder to locate the studs in your target area and mark a plumb vertical line down each one. Plan one bracket column per stud.
- Cut your boards to length.
- You only need to drill the far-end holes (at the two end columns) to mount the board and get it level. Holes for any columns in between can be drilled after the board is on the wall if you prefer. Use the drilling jig for alignment.
Step 3 - Mount It
The brackets dovetail together, so the next bracket must be seated before the bolt is tightened. Work from the bottom up.
- Set your level first: mount the bottom bracket (shoe) of one end column, then the bottom bracket of the far end column, using a level between them so the whole installation sits level. This sets the baseline for every column in between.
- Slide a pre-drilled board into the channel of the lower bracket.
- Pass a lag bolt through the board hole and through the lower bracket.
- Dovetail the next bracket up onto the lower one now, before tightening.
- Drive the lag bolt into the wall and stud to snug the assembly down, keeping the column plumb.
- Continue up each column, board by board.
- The cap gets no bolt. It simply dovetails onto the top of the column and rests there.
More Printing
Now head into our library of stuffs and start printing your accessory brackets.
Or download our blank accessory bracket templates and build your own.